How to Create a TODO App in Flutter?
In this blog, we learn to create a todo App in Flutter with a basic folder structure. The directory structure follows a typical Flutter app architecture, with separate directories for platform-specific code (android, ios), main app logic (lib), including models for data representation (models), screens for UI views (screens), and reusable UI components (widgets).
The main.dart file serves as the entry point, coordinating the app’s initialization and setup. The todo.dart file likely defines a data model for individual to-do items, while home_screen.dart represents the primary screen displaying the to-do list.
The todo_item.dart file likely defines a reusable widget for rendering individual to-do items. This architecture promotes code organization and maintainability, adhering to the separation of concerns principle.
Before starting be sure to install Flutter and Dart on your local machine.
Table of Contents
Before Starting: Flutter Project Ideas for Beginners: 15 Apps to Get Started
Steps to Create a todo App in Flutter
To create a todo app in Flutter, you can follow these steps:
1. Create a new Flutter project – todo App in Flutter
flutter create todo_app2. Set up the app structure
Your app structure should look something like this:
todo_app/
|- android
|- ios
|- lib
   |- main.dart
   |- models
      |- todo.dart
   |- screens
      |- home_screen.dart
   |- widgets
      |- todo_item.dart
3. Create the Todo model
In the models/todo.dart file, create a Todo class to represent a single todo item:
class Todo {
  int? id;
  String title;
  bool isCompleted;

  Todo({required this.title, this.isCompleted = false});

  void toggleCompleted() {
    isCompleted = !isCompleted;
  }
}
4. Create the TodoItem widget for todo App in Flutter
In the widgets/todo_item.dart file, create a TodoItem widget to display a single todo item:
import 'package:flutter/material.dart';
import 'package:todo_app/models/todo.dart';

class TodoItem extends StatelessWidget {
  final Todo todo;
  final Function(Todo) toggleCompleted;
  final Function(Todo) deleteTodo;

  const TodoItem({super.key,
    required this.todo,
    required this.toggleCompleted,
    required this.deleteTodo,
  });

  @override
  Widget build(BuildContext context) {
    return ListTile(
      leading: Checkbox(
        value: todo.isCompleted,
        onChanged: (value) => toggleCompleted(todo),
      ),
      title: Text(
        todo.title,
        style: TextStyle(
          decoration: todo.isCompleted ? TextDecoration.lineThrough : null,
        ),
      ),
      trailing: IconButton(
        icon: const Icon(Icons.delete),
        onPressed: () => deleteTodo(todo),
      ),
    );
  }
}
5. Create the HomeScreen
In the screens/home_screen.dart file, create the HomeScreen widget to display the todo list and handle adding/removing/updating todos:
import 'package:flutter/material.dart';
import 'package:todo_app/models/todo.dart';
import 'package:todo_app/widgets/todo_item.dart';

class HomeScreen extends StatefulWidget {
  @override
  _HomeScreenState createState() => _HomeScreenState();
}

class _HomeScreenState extends State<HomeScreen> {
  final List<Todo> todos = [];
  final TextEditingController _todoController = TextEditingController();

  void _addTodo() {
    final String title = _todoController.text.trim();
    if (title.isNotEmpty) {
      final Todo todo = Todo(title: title);
      setState(() {
        todos.add(todo);
        _todoController.clear();
      });
    }
  }

  void _toggleCompleted(Todo todo) {
    setState(() {
      todo.toggleCompleted();
    });
  }

  void _deleteTodo(Todo todo) {
    setState(() {
      todos.remove(todo);
    });
  }

  @override
  Widget build(BuildContext context) {
    return Scaffold(
      appBar: AppBar(
        title: const Text('Todo App'),
      ),
      body: Column(
        children: [
          Padding(
            padding: const EdgeInsets.all(16.0),
            child: TextField(
              controller: _todoController,
              decoration: InputDecoration(
                hintText: 'Add a new todo',
                suffixIcon: IconButton(
                  icon: const Icon(Icons.add),
                  onPressed: _addTodo,
                ),
              ),
            ),
          ),
          Expanded(
            child: ListView.builder(
              itemCount: todos.length,
              itemBuilder: (context, index) {
                final todo = todos[index];
                return TodoItem(
                  todo: todo,
                  toggleCompleted: _toggleCompleted,
                  deleteTodo: _deleteTodo,
                );
              },
            ),
          ),
        ],
      ),
    );
  }
}
6. Update the main.dart file
In the main.dart file, replace the existing code with the following:
import 'package:flutter/material.dart';
import 'package:todo_app/screens/home_screen.dart';

void main() {
  runApp(const MyApp());
}

class MyApp extends StatelessWidget {
  const MyApp({super.key});

  @override
  Widget build(BuildContext context) {
    return MaterialApp(
      title: 'Todo App',
      theme: ThemeData(
        primarySwatch: Colors.blue,
      ),
      home: HomeScreen(),
    );
  }
}
That’s it! You now have a fully functional todo app in Flutter. You can run the app using the flutter run command or by clicking the run button in your IDE.
This code covers the basic functionality of a todo app, including adding, marking as completed, and deleting todos. You can further enhance the app by adding more features like persistence (saving todos to a database or local storage), editing todos, and more.
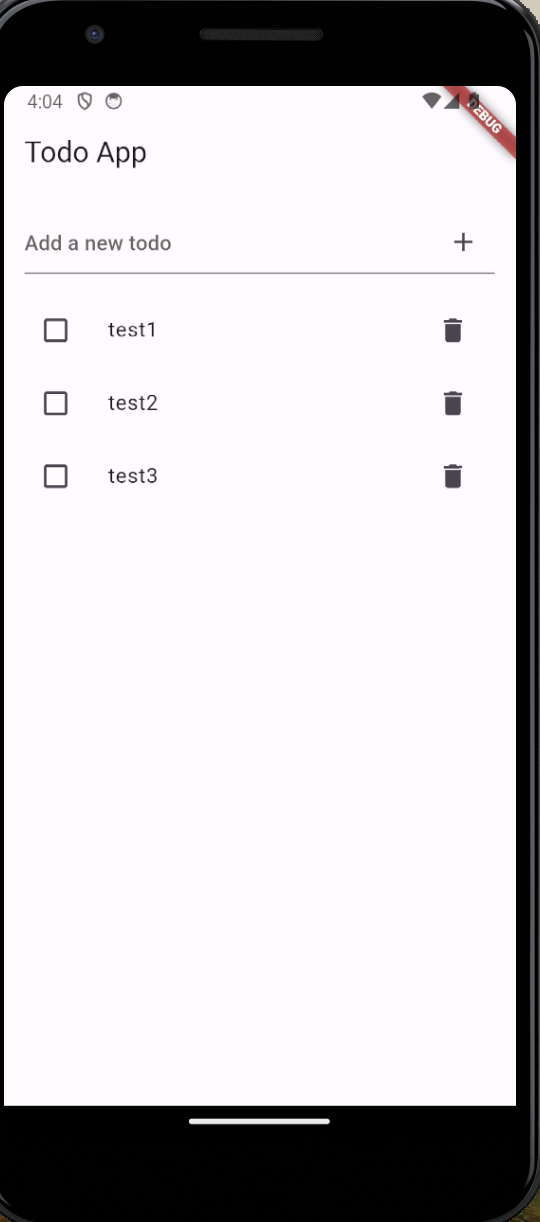
Output:
Also Read:
At the End
This Flutter code initializes the Todo App by defining the main entry point in main.dart. It imports the necessary packages, including material.dart for Flutter’s material design widgets, and home_screen.dart for the app’s main screen.
The main function runs the app by calling runApp() with an instance of MyApp. MyApp is a Stateless widget that configures the MaterialApp widget, setting the app’s title to ‘Todo App’ and applying a blue color theme.
It sets the HomeScreen() as the initial screen to be displayed when the app launches. Overall, this code sets up the basic structure and appearance of the Todo App, ready to display the home screen containing the to-do list.

About Ambika Dulal
Lead Mobile App Developer and Tech Consultant specializing in Flutter, Dart, and Firebase.