How to Add Custom Back Button in Flutter?
In this blog post, we’ll explore how to implement a custom back button in Flutter, enhancing both the functionality and aesthetics of your app.
One aspect that significantly impacts usability is the navigation within the app, particularly the ability to return to the previous screen effortlessly.
Table of Contents
Back Button in Flutter
When users navigate through your Flutter app, providing a recognizable and visually appealing back button can improve usability and make navigation more intuitive. While Flutter provides a default back button behavior, customizing it allows developers to tailor the app’s design to better fit their brand identity and user preferences.
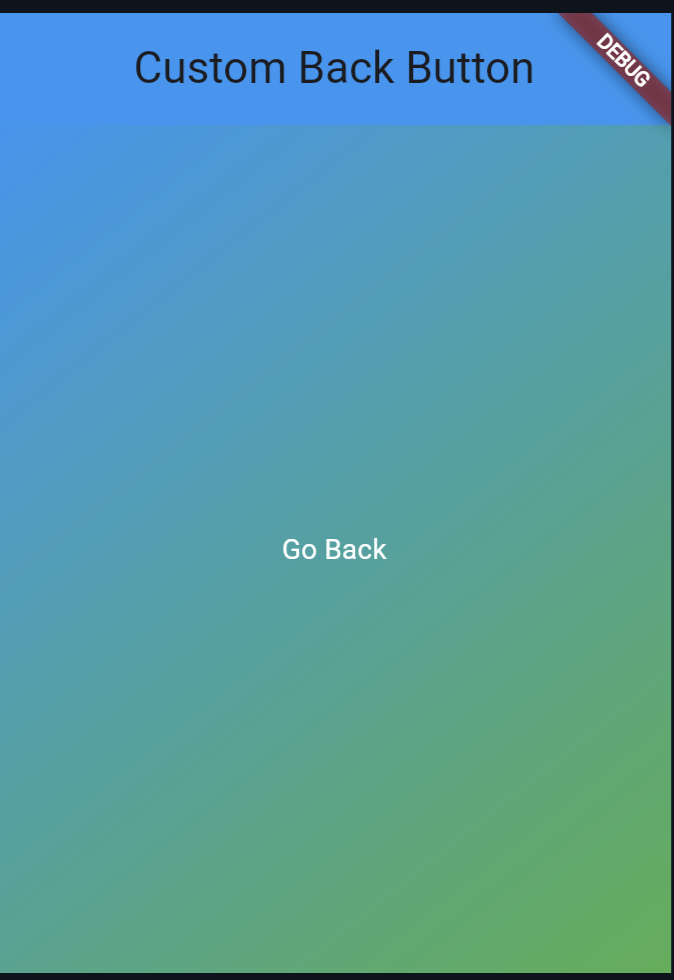
Example 1: Custom Back Button with Gradient Background:
import 'package:flutter/material.dart';

void main() {
  runApp(MyApp());
}

class MyApp extends StatelessWidget {
  @override
  Widget build(BuildContext context) {
    return MaterialApp(
      home: Scaffold(
        appBar: AppBar(
          title: Text('Custom Back Button'),
          backgroundColor: Colors.blue,
        ),
        body: Container(
          decoration: BoxDecoration(
            gradient: LinearGradient(
              begin: Alignment.topLeft,
              end: Alignment.bottomRight,
              colors: [Colors.blue, Colors.green],
            ),
          ),
          child: Center(
            child: TextButton(
              onPressed: () {
                Navigator.pop(context);
              },
              child: Text('Go Back', style: TextStyle(color: Colors.white)),
            ),
          ),
        ),
      ),
    );
  }
}
Output:
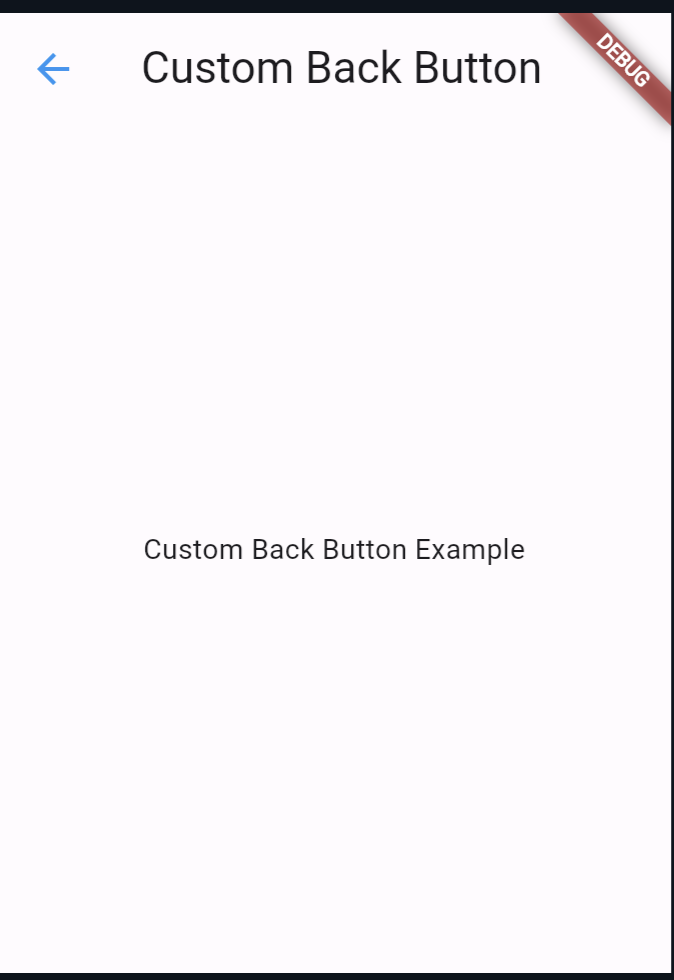
Example 2: Custom Back Button with AppBar:
import 'package:flutter/material.dart';

void main() {
  runApp(MyApp());
}

class MyApp extends StatelessWidget {
  @override
  Widget build(BuildContext context) {
    return MaterialApp(
      home: MyHomePage(),
    );
  }
}

class MyHomePage extends StatelessWidget {
  @override
  Widget build(BuildContext context) {
    return Scaffold(
      appBar: AppBar(
        title: Text('Custom Back Button'),
        leading: IconButton(
          icon: Icon(Icons.arrow_back_ios), // Different icon for back button
          onPressed: () {
            Navigator.pop(context);
          },
        ),
      ),
      body: Center(
        child: Text('Custom Back Button Example'),
      ),
    );
  }
}
Output:

In this example, we’ve used IconButton within the leading property of the AppBar to create a custom back button. We’ve set the icon to Icons.arrow_back_ios, providing a different icon for the back button. When pressed, it navigates back to the previous screen using Navigator.pop(context).
Customizing the back button in Flutter not only improves the app’s usability but also enhances its visual appeal. By implementing custom back buttons with attractive UI elements, such as gradients or background images, developers can create a more engaging user experience.
Incorporating these techniques into your Flutter app design can elevate its overall look and feel while ensuring seamless navigation for users. Remember to prioritize usability and aesthetics when customizing back buttons to create a cohesive and visually pleasing user interface.
Example 3: Custom Color of Back Button with AppBar:
import 'package:flutter/material.dart';

void main() {
  runApp(MyApp());
}

class MyApp extends StatelessWidget {
  @override
  Widget build(BuildContext context) {
    return MaterialApp(
      home: MyHomePage(),
    );
  }
}

class MyHomePage extends StatelessWidget {
  @override
  Widget build(BuildContext context) {
    return Scaffold(
      appBar: AppBar(
        title: Text('Custom Back Button'),
        leading: BackButton(
          color: Colors.blue, // Customizing the color of the back button
          onPressed: () {
            Navigator.pop(context);
          },
          // You can also customize the icon by providing a different icon widget
          // icon: Icon(Icons.arrow_back),
        ),
      ),
      body: Center(
        child: Text('Custom Back Button Example'),
      ),
    );
  }
}
Implementing these strategies will not only enhance user experience but also contribute to better app engagement and retention.
Output:
Also Read:
Conclusion:
In conclusion, customizing the back button in Flutter is a simple yet effective way to enhance the usability and aesthetics of your app. By following the examples provided in this blog post, you can create custom back buttons that seamlessly integrate with your app’s design, improving user experience and overall satisfaction.
You can follow the official: details of font sizes in flutter to explore more.

About Ambika Dulal
Lead Mobile App Developer and Tech Consultant specializing in Flutter, Dart, and Firebase.